Blender in fullscreen under OSX

Running blender with the argument “-W” starts it in fullscreen mode.
But under OSX, users applications stored in the folder /Applications are not ran like command line tools.
In a terminal windows, using CLI, you are supposed to run the command open to invoke users applications.
Then, you can add an argument to open to append arguments to your executable!

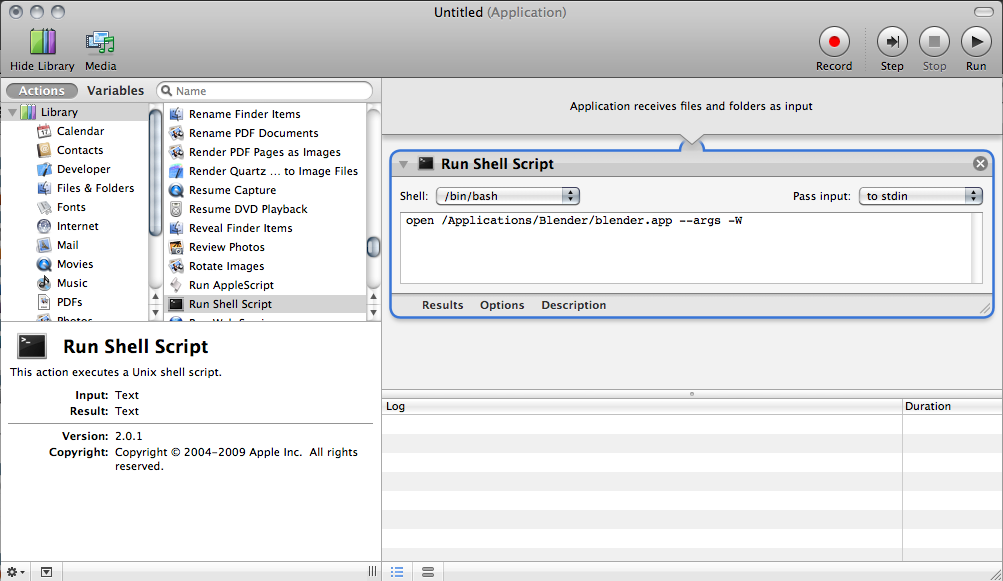
open /Applications/Blender/blender.app --args -W

I tried to put it directly in Info.plist which wasn’t possible.

Using automator I have been able to build another user application (kind of script) that runs Blender with the fullscreen parameter.
All through the Finder so it’s easy, even for newbs and lazy creatures.

Finally you can shortcut it to your dock or anywhere else.

blender_fullscreen.app

ERRATA
I had some strange issues using the -W switch. Use the command below instead :

open /Applications/Blender/blender.app --args -p 0 900 1440 900

Where 1440 and 900 are X & Y of your resolution.

Open the package using open package content of your Automator script and edit Info.plist. Add:

<key>LSUIPresentationMode</key>
<real>4</real>

/ERRATA

Hello RS485 with Arduino

Nothing fancy here, just trying to get started with RS485 and Arduino. So here we go for a basic setup with one master that only emits and one slave that just listens. See the comments for the wiring:

/* RS 485 V1 Master, using a SN75176BP

                              -------
                          RO -|     |- VCC [connect to 5v]
                              |     |
                          RE -|     |- B-------------->   [connect to Slave's B]
                              |     |        | 120R (parallel resistor)
          connect to 5V   DE -|     |- A-------------->   [connect to Slave's A]
                              |     |
   connect to pin 1 (TX)  DI -|     |- GND [connect to GND]
                              -------

*/
const int ledPin = 13;      // the pin that the LED is attached to

void setup() {
  Serial.begin(9600);
  pinMode(ledPin, OUTPUT);
}

void loop() {

  byte b = 0;

  Serial.write(b);
  analogWrite(ledPin, b);
  delay(1000);

  b=255;

  Serial.write(b);
  analogWrite(ledPin, b);
  delay(1000);
}

And now for the slave:

/* RS 485 V1 SLAVE, using a SN75176BP

                              -------
   connect to pin 0 (RX)  RO -|     |- VCC [connect to 5v]
                              |     |
          connect toGND   RE -|     |- B-------------->   [connect to Master's B]
                              |     |        | 120R (parallel resistor)
                          DE -|     |- A-------------->   [connect to Master's A]
                              |     |
                          DI -|     |- GND [connect to GND]
                              -------

YOU'LL HAVE TO DISCONNECT RO DURING UPLOAD TO I/O BOARD!!!!!!!!!                          

*/
const int ledPin = 13;      // the pin that the LED is attached to

void setup() {
  Serial.begin(9600);
  pinMode(ledPin, OUTPUT);
}

void loop() {
  byte brightness;

  if (Serial.available()) {// check if data has been sent from the computer:

    brightness = Serial.read(); // read the most recent byte (which will be from 0 to 255):

    analogWrite(ledPin, brightness); // set the brightness of the LED:
  }
}

If all goes according to the plan, you should see something like this: